Many warehouses and industrial plants in dry climates, such as the Southwestern United States, use evaporative coolers rather than mechanical air conditioning because evaporative coolers are more economical to operate. Engineers for commercial or industrial facilities that rely on evaporative coolers know the units are simple and dependable, but, like any mechanical device, occasionally need maintenance and service.
Begin your troubleshooting by verifying proper installation of the unit. For ducted coolers that have variable sheaves (motor pulleys), ensure that the sheave settings are set to the motor-nameplate amps. Make sure exhaust ducting is available when setting motor amps; there should be approximately 2 sq ft of exhaust for every 1,000 cfm of airflow the cooler produces.
The water supply line to the cooler float should be ¼-in. copper tubing, and this line must be secured. Unsecured water lines can set up water hammering from the cooler all the way down to the shutoff valve.
Evaporative coolers should be connected to a dedicated and properly fused electric supply line.
To block off ductwork during a winter shutdown, a ductwork riser with a removable damper should be installed between the cooler and roof.
Troubleshooting Tips
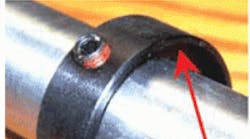
1. If an evaporative-cooling unit’s blower seems to be operating out of round (usually characterized by noise and vibration), check the eccentric collar attached to the bearing inner race collar. If the eccentric collar is not attached or is loose, reattach it to the inner race collar by rotating the eccentric collar in the direction of airflow, and then tightening the set screw.
There are 11 steps to this process:
Step 1. Slide the eccentric collar over the shaft. The undercut of the collar should face the end of the shaft (Photo A).
Step 2. Slide the bearing assembly over the shaft (Photo B).
Step 3. Determine the final bearing-assembly location. This is determined by how much shaft is necessary to mount the blower pulley.
Step 4. Bolt the bearing assembly to the bearing support bar. At this point, make it only finger-tight, as it will need to be loose to permit adjustment of the shaft (Photo C).
Step 5. Repeat the first three steps for the other side of the blower assembly.
Step 6. Slide the eccentric collar up to the inner race of the bearing assembly. Rotate the collar in the direction of the blower rotation and ensure there is no gap between the collar and the bearing assembly (Photos D and E).
Step 7. Determine the correct blower-wheel orientation for a down or side draft, on the left or right side of the blower housing.
Step 8. Use a collar wrench and then tighten the set screws on the eccentric collar using a torque wrench to 126 to 164 in. lb (Photos F and G).
Step 9. Finish tightening the fasteners for the bearing assembly to the bearing support bar.
Step 10. Tighten the collar and bearings on the other side of the blower housing.
Step 11. Center the blower wheel and tighten the shaft keys.
2. When setting the unit’s motor to the nameplate amps, make sure there is adequate relief exhaust (2 sq ft per 1,000 cfm). If the motor cycles on and off, check the sheave adjustment.
3. If the unit’s motor cannot be adjusted to the nameplate amps, determine if the correct sheave was purchased for the application. Note that some applications require revolutions per minute setting at designated static pressures. Higher revolutions per minute at some static pressures when the motor is set at nameplate amps will cause water entrainment.
4. When sizing the cooler application and external static pressure is not known (e.g., it was not provided by the design engineer), size the application for zero static pressure. Use the revolutions per minute for zero static based on the technical information provided by the manufacturer and determine which sheave will operate at that rpm.
5. The float supply line must be secure or it will cause water hammering. If water is draining over the standpipe, readjust the float. Allow space just below standpipe height so that when the pump shuts off, there is enough room for the water that is draining from the media.
6. Check if the bottom reservoir pan needs recoating. Clean any residue or loose coating from the pan. Some sanding might be required. Recoat the pan with a polyurethane elastomeric sealant.
7. Inspect the aspen or rigid media frequently. If areas of the media become saturated with calcium deposits and there are areas on the same pad-frame or wet-section assembly that are not saturated, the non-saturated areas will cause water entrainment because the air velocity is higher in that area.
8. To minimize calcium buildup on the media, use bleed-off tubing that allows a portion of the recirculated water to drain away from the cooler. If water consumption is a concern, purchase a drain pump equipped with a built-in timer that allows the pump to drain the water from the reservoir every 12 hr of pump operation.
Paul Benich is warranty manager for Phoenix Manufacturing Inc., a manufacturer and supplier of evaporative-cooling products.
